Spring中常见注解
-
@Component:标注一个普通的Spring Bean类
-
@Respository:标注一个DAO的组件类
-
@Service:标注一个业务逻辑组件类
-
@Controller:标注一个控制器组件类
-
@Autowired:可用于为类的属性、构造器、方法进行注值
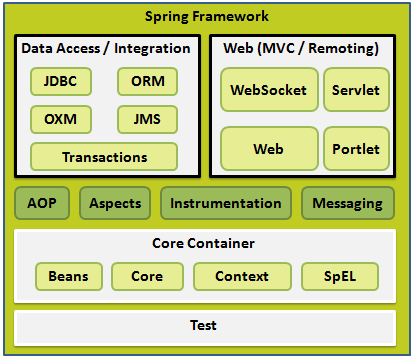
Spring技术:
- 依赖注入(DI):控制反转(IOC)的一种具体实现
注入方式有:通过构造函数传递参数的方式,通过使用setter方法的等等
-
面向切面的编程(AOP):一个程序中跨越多个点的功能称为横切关注点 ,独立于业务逻辑,如日志记录、声明性事物、安全性以及缓存等等。
AOP将横切关注点从他们所影响的对象中分离出来,DI则将应用程序彼此分离出来。
Spring Hello World实例:
首先定义一个HelloWorld类,有message属性以及相关的setter和getter方法,然后在MainApp文件中使用ClassPathXmlApplicationContext(“xxx.xml”)创建应用程序的上下文,创建初始化beans的配置文件所有的对象,之后可以通过getBean方法获取所需要的bean,根据bean的ID获取对象。在xml配置文件创建自己需要的实例化对象,从而不需要修改HelloWorld.java和MainApp.java文件。
Spring的BeanFactory容器:常用在移动设备和applet的应用中,最常用的XmlBeanFactory,通过xml加载初始化bean
Spring的ApplicationContext容器:
常用的:
-
FileSystemXmlApplicationContext:需要提供xml文件的绝对路径,该容器会从xml中加载已被定义的bean,
-
ClassPathXmlApplicationContext:在CLASSPATH环境变量中搜索XML配置文件,该容器就会从xml中加载配置文件,
-
WebXmlApplicationContext:在web应用程序的范围内加载xml配置文件
Bean:
bean是一个被实例化,组装,并且被Spring IOC容器所管理的对象。bean是由容器通过配置元数据创建的。
配置元数据对应bean定义的属性:

Spring配置元数据:
XML方式:
<?xml version="1.0" encoding="UTF-8"?>

<beans xmlns="http://www.springframework.org/schema/beans"
    xmlns:xsi="http://www.w3.org/2001/XMLSchema-instance"
    xsi:schemaLocation="http://www.springframework.org/schema/beans
    http://www.springframework.org/schema/beans/spring-beans-3.0.xsd">

   <bean id="helloWorld" class="com.tutorialspoint.HelloWorld" lazy-init="true" lazy-method="..." destroy-method="...">
       <property name="message" value="Hello World!"/>
   </bean>

</beans>
基于注解的配置方式:
- @Require:应用于bean属性的setter方法。
- @Autowired:应用于bean属性的setter方法和非setter方法,构造函数和属性。
- @Qualifier:通过指定确切的将被连线的bean,通常和@Autowired一起使用来删除混乱。
- JSR-250 Annotation
在IoC容器可以看到实例。
基于Java的配置方式:
以上两种方式都是需要配置xml的基础上编写spring bean,但是基于java config,可以在不用编写xml上完成spring bean的配置。
- @Configuration:表明该类可以使用Spring IoC容器作为bean的定义来源
- @Bean:将方法名作为bean的id
- @Import(xxx.class):允许加载另外一个配置类@Bean定义
- 生命周期回调:@Bean(initMethod=”xxx”, destoryMethod=”xxx”)
- @Bean注解下可以使用@Scope注解指定Bean的范围
IoC容器
Bean的scope属性:
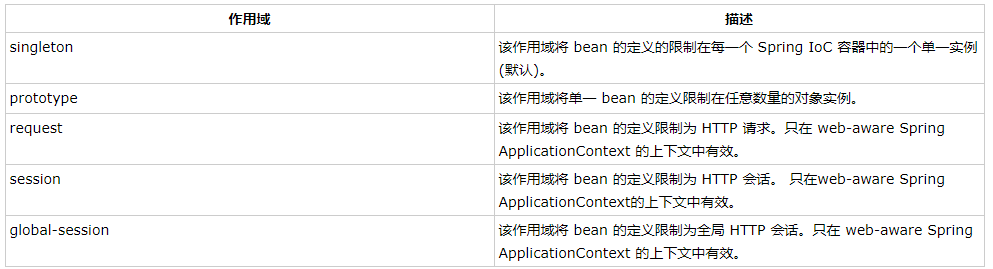
<bean id="helloWorld" scope="singleton">
       <property name="message" value="Hello World!"/>
 </bean>
Bean的生命周期:
初始化回调:类可以通过实现org.springframework.beans.factory.InitializingBean 的void afterPropertiesSet(),也可以通过XML的配置元数据中init-method指定一个void无参方法。
public class ExampleBean implements InitializingBean {
   @Overwrite
   public void afterPropertiesSet() {
      // do some initialization work
   }
}
<bean id="exampleBean"
         class="examples.ExampleBean" init-method="init"/>

//在类中定义一下方法
public class ExampleBean {
    public void init() {}
}
销毁回调:通过可以通过实现org.springframework.beans.factory.DisposableBean的destory方法,亦或者在xml中配置destory-method属性
public class ExampleBean implements DisposableBean {
   @Overwrite
   public void destroy() {
      // do some destruction work
   }
}
<bean id="exampleBean"
         class="examples.ExampleBean" destroy-method="destroy"/>

public class ExampleBean {
   public void destroy() {
      // do some destruction work
   }
}
Spring的BeanPostProcessor:Bean的后置处理器
BeanPostProcessor接口定义了回调方法,可以通过这些方法实现自己的实例化逻辑,依赖解析等等,也可以对bean对象实例进行操作。
/*HelloWorld.java*/
public class HelloWorld {
   private String message;
   public void setMessage(String message){
      this.message  = message;
   }
   public void getMessage(){
      System.out.println("Your Message : " + message);
   }
   public void init(){
      System.out.println("Bean is going through init.");
   }
   public void destroy(){
      System.out.println("Bean will destroy now.");
   }
}
/*InitHelloWorld.java*/
import org.springframework.beans.factory.config.BeanPostProcessor;
import org.springframework.beans.BeansException;
public class InitHelloWorld implements BeanPostProcessor {
   public Object postProcessBeforeInitialization(Object bean, String beanName) throws BeansException {
      System.out.println("BeforeInitialization : " + beanName);
      return bean;  // you can return any other object as well
   }
   public Object postProcessAfterInitialization(Object bean, String beanName) throws BeansException {
      System.out.println("AfterInitialization : " + beanName);
      return bean;  // you can return any other object as well
   }
}
/*MainApp.java*/
import org.springframework.context.support.AbstractApplicationContext;
import org.springframework.context.support.ClassPathXmlApplicationContext;
public class MainApp {
   public static void main(String[] args) {
      AbstractApplicationContext context = new ClassPathXmlApplicationContext("Beans.xml");
      HelloWorld obj = (HelloWorld) context.getBean("helloWorld");
      obj.getMessage();
      context.registerShutdownHook();//关闭hook,确保bean被销毁
   }
}

/*Beans.xml*/
<?xml version="1.0" encoding="UTF-8"?>

<beans xmlns="http://www.springframework.org/schema/beans"
    xmlns:xsi="http://www.w3.org/2001/XMLSchema-instance"
    xsi:schemaLocation="http://www.springframework.org/schema/beans
    http://www.springframework.org/schema/beans/spring-beans-3.0.xsd">

   <bean id="helloWorld" class="com.tutorialspoint.HelloWorld"
       init-method="init" destroy-method="destroy">
       <property name="message" value="Hello World!"/>
   </bean>

   <bean class="com.tutorialspoint.InitHelloWorld" order="..可以用来定义执行前后的顺序..."/>

</beans>
依赖注入(DI):
- 构造器式注入:依赖性更强,传递参数可通过按顺序,传递参数属性亦或着索引。
public class TextEditor {
   private SpellChecker spellChecker;
   private String name;
   public TextEditor( SpellChecker spellChecker, String name ) {
      this.spellChecker = spellChecker;
      this.name = name;
   }
   public SpellChecker getSpellChecker() {
      return spellChecker;
   }
   public String getName() {
      return name;
   }
   public void spellCheck() {
      spellChecker.checkSpelling();
   }
}
<?xml version="1.0" encoding="UTF-8"?>

<beans xmlns="http://www.springframework.org/schema/beans"
    xmlns:xsi="http://www.w3.org/2001/XMLSchema-instance"
    xsi:schemaLocation="http://www.springframework.org/schema/beans
    http://www.springframework.org/schema/beans/spring-beans-3.0.xsd">

   <!-- Definition for textEditor bean -->
   <bean id="textEditor" class="com.tutorialspoint.TextEditor"
      autowire="constructor">
      <constructor-arg value="Generic Text Editor"/>
   </bean>

   <!-- Definition for spellChecker bean -->
   <bean id="SpellChecker" class="com.tutorialspoint.SpellChecker">
   </bean>

</beans>
- setter方式注入:可解耦合性更高
public class Foo {
   public Foo(Bar bar, Baz baz) {
      // ...
   }
}
<?xml version="1.0" encoding="UTF-8"?>

<beans xmlns="http://www.springframework.org/schema/beans"
    xmlns:xsi="http://www.w3.org/2001/XMLSchema-instance"
    xsi:schemaLocation="http://www.springframework.org/schema/beans
    http://www.springframework.org/schema/beans/spring-beans-3.0.xsd">

   <bean id="john-classic" class="com.example.Person">
      <property name="bar" ref="bar"/>
   </bean>

   <bean name="bar" class="com.example.Bar">
   </bean>

</beans>
注入内部Bean方式
<?xml version="1.0" encoding="UTF-8"?>

<beans xmlns="http://www.springframework.org/schema/beans"
    xmlns:xsi="http://www.w3.org/2001/XMLSchema-instance"
    xsi:schemaLocation="http://www.springframework.org/schema/beans
    http://www.springframework.org/schema/beans/spring-beans-3.0.xsd">

   <bean id="john-classic" class="com.example.Person">
       <property name="bar" ref="bar">
       		<bean name="bar" class="com.example.Bar"></bean>
       </property>
   </bean>
</beans>
集合类的注入有特定赋值方式,具体可见这个链接。
以上的xml配置,均为显示注入依赖,Beans还可以通过指定bean的autowire属性为一个bean定义一个自动装配的模式: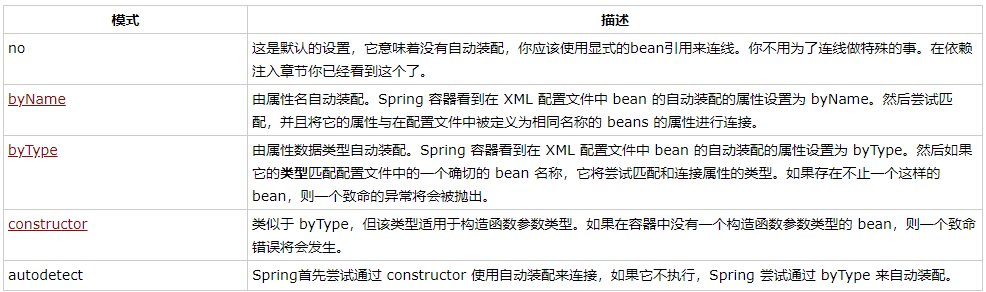
@Required注解
import org.springframework.beans.factory.annotation.Required;
public class Student {
    private Integer age;

    @Required
    public void setAge(Integer age) {
        this.age = age;
    }
    public Integer getAge() {
        return age;
    }
}
对应的xml文件
<bean id="student" class="com.tutorialspoint.Student">
    <property name="name"  value="Zara" />

    <!-- try without passing age and check the result -->
    <!-- property name="age"  value="11"-->
</bean>
对应的property一定要写,否则会报以下错误
Property ‘age’ is required for bean ‘student’
@Autowired注解
- 可以实现bean的autowired属性的功能
- 可以去除setter方法,直接给需要注入的属性加上@Autowired注解即可
- 可以用在构造器方法上
- 默认此依赖是必须,可以通过@Autowired(required=false)关闭默认行为
@Qualifier(“”):指定具体对象注入
//Profile.java
import org.springframework.beans.factory.annotation.Autowired;
import org.springframework.beans.factory.annotation.Qualifier;
public class Profile {
   @Autowired
   @Qualifier("student1")//指定注入id为student1的bean
   private Student student;
   public Profile(){
      System.out.println("Inside Profile constructor." );
   }
   public void printAge() {
      System.out.println("Age : " + student.getAge() );
   }
   public void printName() {
      System.out.println("Name : " + student.getName() );
   }
}
//MainApp.java
import org.springframework.context.ApplicationContext;
import org.springframework.context.support.ClassPathXmlApplicationContext;
public class MainApp {
   public static void main(String[] args) {
      ApplicationContext context = new ClassPathXmlApplicationContext("Beans.xml");
      Profile profile = (Profile) context.getBean("profile");
      profile.printAge();
      profile.printName();
   }
}
<!-- Definition for student1 bean -->
<bean id="student1" class="com.tutorialspoint.Student">
    <property name="name"  value="Zara" />
    <property name="age"  value="11"/>
</bean>

<!-- Definition for student2 bean -->
<bean id="student2" class="com.tutorialspoint.Student">
    <property name="name"  value="Nuha" />
    <property name="age"  value="2"/>
</bean>
输出结果:
Inside Profile constructor.
Age : 11
Name : Zara
Java Config方式配置示例
import org.springframework.context.annotation.*;
@Configuration
public class HelloWorldConfig {
   @Bean
   public HelloWorld helloWorld(){
      return new HelloWorld();
   }
}

//以上代码等同于如下的xml配置
<beans>
   <bean id="helloWorld" class="com.tutorialspoint.HelloWorld" />
</beans>
//mainApp.java
import org.springframework.context.ApplicationContext;
import org.springframework.context.annotation.*;

public class MainApp {
   public static void main(String[] args) {
      ApplicationContext ctx =
      new AnnotationConfigApplicationContext(HelloWorldConfig.class);
	 /*也可以通过如下方式加载多个配置文件
	  ApplicationContext ctx = new AnnotationConfigApplicationContext();
	  ctx.register(AppConfig.class, OtherConfig.class);
   	  ctx.register(AdditionalConfig.class);
   	  ctx.refresh();
	 */
      HelloWorld helloWorld = ctx.getBean(HelloWorld.class);

      helloWorld.setMessage("Hello World!");
      helloWorld.getMessage();
   }
}
Spring框架的AOP
AOP:面向切面编程,横切关注点是指跨一个应用程序多个点的功能,例如日志记录、审计、安全性和缓存等等。
基于XML配置的实例
<aop:config>
   <aop:aspect id="myAspect" ref="aBean">
      <aop:pointcut id="businessService"
         expression="execution(* com.xyz.myapp.service.*.*(..))"/>
      <!-- a before advice definition -->
      <aop:before pointcut-ref="businessService"
         method="doRequiredTask"/>
      <!-- an after advice definition -->
      <aop:after pointcut-ref="businessService"
         method="doRequiredTask"/>
      <!-- an after-returning advice definition -->
      <!--The doRequiredTask method must have parameter named retVal -->
      <aop:after-returning pointcut-ref="businessService"
         returning="retVal"
         method="doRequiredTask"/>
      <!-- an after-throwing advice definition -->
      <!--The doRequiredTask method must have parameter named ex -->
      <aop:after-throwing pointcut-ref="businessService"
         throwing="ex"
         method="doRequiredTask"/>
      <!-- an around advice definition -->
      <aop:around pointcut-ref="businessService"
         method="doRequiredTask"/>
   ...
   </aop:aspect>
</aop:config>
<bean id="aBean" class="...">
...
</bean>
使用@Aspect
在xml配置中只需要配置bean即可,以及在xml上加上«aop:aspectj-autoproxy/»配置
import org.aspectj.lang.annotation.Aspect;
import org.aspectj.lang.annotation.Pointcut;
import org.aspectj.lang.annotation.Before;
import org.aspectj.lang.annotation.After;
import org.aspectj.lang.annotation.AfterThrowing;
import org.aspectj.lang.annotation.AfterReturning;
import org.aspectj.lang.annotation.Around;
@Aspect
public class Logging2 {
    /** Following is the definition for a pointcut to select
     *  all the methods available. So advice will be called
     *  for all the methods.
     */
    @Pointcut("execution(* main.java.com.lqb.demo1.aop.*(..))")
    private void selectAll(){}
    /**
     * This is the method which I would like to execute
     * before a selected method execution.
     */
    @Before("selectAll()")
    public void beforeAdvice(){
        System.out.println("Going to setup student profile.");
    }
    /**
     * This is the method which I would like to execute
     * after a selected method execution.
     */
    @After("selectAll()")
    public void afterAdvice(){
        System.out.println("Student profile has been setup.");
    }
    /**
     * This is the method which I would like to execute
     * when any method returns.
     */
    @AfterReturning(pointcut = "selectAll()", returning="retVal")
    public void afterReturningAdvice(Object retVal){
        System.out.println("Returning:" + retVal.toString() );
    }
    /**
     * This is the method which I would like to execute
     * if there is an exception raised by any method.
     */
    @AfterThrowing(pointcut = "selectAll()", throwing = "ex")
    public void AfterThrowingAdvice(IllegalArgumentException ex){
        System.out.println("There has been an exception: " + ex.toString());
    }
}
Spring MVC
- 模型封装了应用程序数据,它们一般有POJO组成
- 视图用于呈现模型数据,一般由它生成客户端(浏览器)可以解析的HTML代码
- 控制器用于处理用户请求,并返回合适的数据给视图
整体框架围绕DispatcherServlet设计,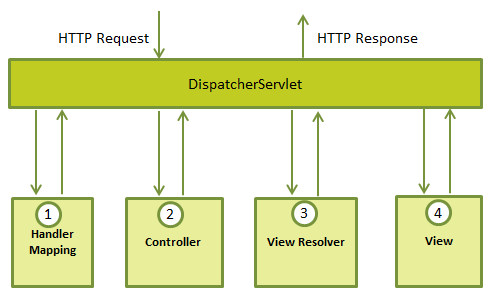
(此图来自w3cschool, 侵权即删)
简略流程:
- 收到一个 HTTP 请求后,DispatcherServlet 根据 HandlerMapping 来选择并且调用适当的控制器。
- 控制器接受请求,并基于使用的 GET 或 POST 方法来调用适当的 service 方法。Service 方法将设置基于定义的业务逻辑的模型数据,并返回视图名称到 DispatcherServlet 中。
- DispatcherServlet 会从 ViewResolver 获取帮助,为请求检取定义视图。
- 一旦确定视图,DispatcherServlet 将把模型数据传递给视图,最后呈现在浏览器中。
spring mvc通过web.xml,配置url请求和处理